Wednesday, February 18, 2009

How to remove 'Subscribe to Post' link in Blogger

“Subscribe to: Post Comments (Atom)” link is added to each page on a blogger blog.
This link is for RSS feed and is published on each page. Instead of this link hogging space in not so stylish manner, you can use feedburner subscription link or any swanky RSS feed icon.


For a newbie finding code to remove this link isn’t easy. Not to worry, login into blogger dashboard. Then click on Layout > Edit HTML and then search for "b:include name=’feedLinks’/"
Delete this line and the link will be gone. Please note, you should backup the template before making any changes. Click on ‘Download full template’ button located on the same page. More from Blogger world coming soon!


Removing Newer and Older Post Links in Blogger Blog

If you are using Blogger as blogging platform, you might be used to some of the built-in features, that you consider hard coded, but can be changed with slight template code modification. One of the hacks, presented in this publication, addresses a seemingly minor issue on the page - two links “Older Posts” and “Newer Posts” on the bottom of the page.

For those, who prefer their blog to be maximally close to the static webpages, these links not just unnecessary, but are plainly irritating. There is a way to remove them once and forever. And that is quite easy to do, even for not very experienced users. Note, that this hack will also remove “home” link from the bottom of the blog page.

Open Layout Tab in your blog profile page, choose Edit HTML, and search your code in your blog template for the following text:

#blog-pager-newer-link {
float: left;
}
#blog-pager-older-link {
float: right;
}
#blog-pager {
text-align: center;
}


Now replace that code with the following code:

#blog-pager-newer-link {
display: none;
}
#blog-pager-older-link {
display: none;
}
#blog-pager {
display: none;
}


Save the template and you are done. I hope that was indeed an easy and straightforward one.

Thursday, February 5, 2009

How to fix "BOOTMGR is missing" in Windows Vista

Find yourself receiving "BOOTMGR is missing, Press Ctrl+Alt+Del to restart" message? Don't stress! Its easier to fix than you think. Here's how:

SOLUTION 1

- Get your Vista installation DVD and pop it into your drive.
- Then restart your computer
.
- Set your computer to boot from DVD or CD in your BIOS.

Vista will ask you for language and keyboard layout information, after which you will be asked if you want to re-install Vista or repair your existing installation.
Select Repair. After which Vista's System Recovery Tool will start.

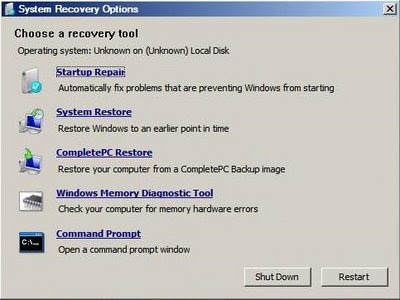
Select Startup Repair and let Vista do its thing! That really is all there is to it!


If that doesn't work try this:


SOLUTION 2

If the previous method does not resolve the problem, you can rebuild the BCD store by using the Bootrec.exe tool in the Windows Recovery Environment. To do this, follow these steps:

- Get your Vista installation DVD and pop it into your drive.
- Then restart your computer.
- Press a key when you are prompted.
- Select a language, a time, a currency, and a keyboard or another input method, and then click Next
- Click Repair your computer
- Click the operating system that you want to repair, and then click Next
- In the System Recovery Options dialog box, click Command Prompt
- Type bootrec /rebuildbcd and then press ENTER

• If Bootrec runs successfully, it will present you with the installation path of a Windows directory. To add the entry to the BCD store, type Yes . A confirmation message appears that indicates the entry was added successfully.

• If Bootrec cannot locate any missing Windows installations, you must remove the BCD store, and then you must re-create it. To do this, type the following commands in the order shown below: (Remember to press ENTER after each command)

bcdedit /export C:\BCD_Backup

ren c:\boot\bcd bcd.old

bootrec /rebuildbcd

- Restart the computer.
------------------------------------------------------------------------------
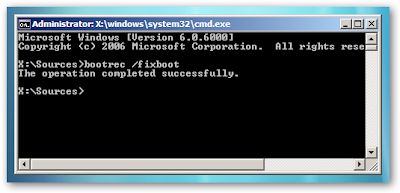
Alternatively you could have chosen the Command Prompt option instead, and use the following command to fix the boot options only:

bootrec /fixboot


At this point you should be able to reboot your computer, remove the DVD and everything should be working. If not, then head over to our forums and ask your question there. We've got some top-notch geeks over there!

Wednesday, February 4, 2009

How to remove Ubuntu from a Vista dual-boot config

On my new PC I wanted (still want) to have to a go with Linux. I chose to experiment with Ubuntu. I downloaded the desktop CD, burned it, freed up some disk space (inside Vista) and loaded up Ubuntu from the CD. After some experimenting I figured out how to install Ubuntu in the empty disk space and it all worked fine (GRUB took over my booting (recognized Vista automatically!) and Ubuntu loaded up fine).

Then I tried to install my GPU drivers and everything went wrong.. For some reason Ubuntu wouldn't boot anymore (failed to load X-Server or something). I was completely lost and wanted to remove Ubuntu.

This is where things start to get really messy!

If you simply remove the Ubuntu partition, GRUB (Linux boot loader) will still be on your PC (in control). It will trip out, as the Ubuntu partition will be removed.. Bad thing!

So you need to restore your Master Boot Record (MBR) for Vista (so that Vista will handle the booting, not GRUB).

Google only pointed me to sites that explained how to REMOVE VISTA, which isn't what I wanted. Many sites talked about the 'fixmbr' command, but this is really only available in Windows XP.

So how do you restore your MBR for Windows Vista?

1. Put the Windows Vista installation disc in the disc drive, and then start the computer.
2. Press a key when you are prompted.
3. Select a language, a time, a currency, a keyboard or an input method, and then click Next.
4. Click Repair your computer.
5. Click the operating system that you want to repair, and then click Next.
6. In the System Recovery Options dialog box, click Command Prompt.
7. Type Bootrec.exe /FixMbr, and then press ENTER.

That's it. Now when you reboot your PC, Vista will load automatically... You can now safely boot using your Ubuntu desktop CD, to use the built in Gnome Partition Manager to remove your Ubuntu partition!